

The Service Program is a business software program that works with QuickBooks® to help you manage all aspects of your service business.
Ideal for numerous service industries, The Service Program is simple to learn, simple to use and easy on the budget. In fact, we think you’ll find it to be one of the most sensible solutions on the market.
Getting started with The Service Program doesn't need to be overwhelming. This guide will walk you through getting the program installed, synced with Quickbooks and will cover the settings that are right for your Company.
In this guide, you’ll learn how to:
- Download and Install of The Service Program
- Update the program
- Starting the program
- Sync the program with QuickBooks®
- Set up the Control Table Settings
If you have questions that are not answered here, Feel free to contact our Support Staff.
There are several ways to get in contact with our support staff.
- Email Training Dept (training@westromsoftware.com) or Tech Support (customersupport@westromsoftware.com)
- By Phone 866.480.1879 option 5 for Training or option 2 for Tech Support.
- Online chat which is accessible at http://support.westromsoftware.com/hc/en-us and clicking on the icons to chat with training and/or support.
Now, Let’s get started.
1. Downloading and Install of The Service Program
Step 1.
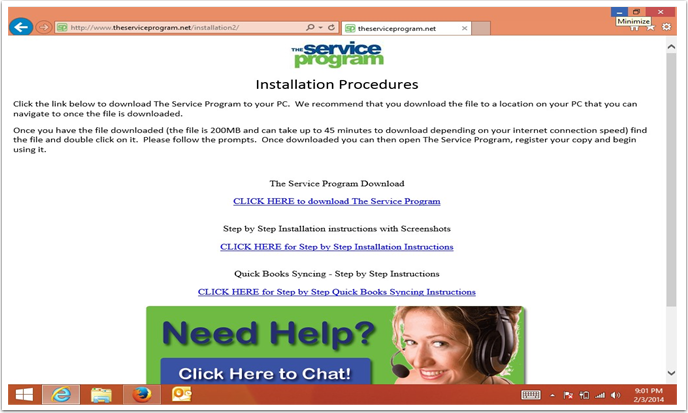
First, you will need to download The Service Program, CLICK HERE to download The Service Program . The download should be saved to a location on your computer before running the install. It is NOT recommended to run from the web due to the size of the installation file. The download should take anywhere between 15 and 30 minutes depending on your internet connection.
Please Note - If you need to install on multiple workstations, after the program is downloaded it can be copied to a shared location and installed on other pc’s without having to wait for the download again.
Step 2.
The next step is a little more involved but don’t worry it is rather simple and we will walk through it together.
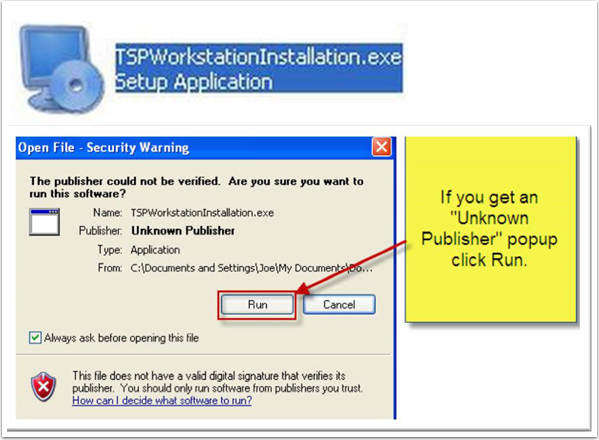
First, you will need to locate where the area that you downloaded The Service Program installation files. To start the installation you will need to "double click" on the icon that says, "TSPWorkstationInstallation.exe".
If you receive the popup shown above, "Open File - Security Warning" you will need to click the button that says, "Run".
Step 3.


Step 13.
---------------------------------------------------------------------------------------------
How to Check for Windows Updates
Important - Now that The Service Program is fully installed you will HAVE to run all Important Windows Office Updates. Depending on which operating system you have the process is different. First we will cover Windows 7, Windows 8 and then Windows XP.
Go to the start menu and select all programs and windows updates. That should bring you to the following screen.
Windows 7 - Check for updates

Hit the "Check for updates" link and once updates are available click the button that says, "Install Updates". Repeat the install process until there are No longer any "important updates" to run.
Windows 8 - Check for Updates
Hit the windows key and type in "Windows Updates".

To check for windows updates inside of Windows 8 first you must make your way to the "Start Screen" and then you can simply start typing. Type the words "Windows Update". If you do not see "Windows Update" show up then type in "Control Panel" and hit the enter key. Next, click on "System and Security" and then click on "Check for updates".

Windows XP - Check for updates
Go to Start -> all programs -> windows updates.

Click the "Express" button.

When you get to this screen click the button that says, "Install Updates".

Once the windows updates have been applied you will see a message that says, Installation Complete". If you are given the option to "Restart Now" then please reboot the machine. If you are not given an option to Reboot, please check for updates again and verify there are no others waiting to be applied.

You will repeat the above steps until you are shown a screen that says, "No High-Priority Updates for your computer are available".
The Service Program - How to check for updates
Now that you have all of the windows updates you will want to make sure that The Service Program is updated to the latest version.
Lets run "Check for Updates" for The Service Program.

Go to Programs -> The Service Program -> Check for Updates.

Select "Next".

The system will let you know if there is an available update. If there is, hit the "Next" button.

Click the "next" button.

Select "I Agree to the terms of this license agreement" and then hit the "Next" button.

Hit the "Next" button.

Leave the default (No Need to change anything here) and then hit the "Next" button.

Leave the default settings and simply click the "Next" button.

Click the "Next" button.
Click the "Finish" button.
Your installation is now complete! We have now accomplished the first 3 steps. We have downloaded the software, installed the software, and updated Windows and The Service Program. We are now ready to start using The Service Program.
Starting The Service Program for the first time.
On your desktop you will see The Service Program Icon.

If you double click on this Icon it will start The Service Program.

IF you receive this popup, Please select "Don't Make Changes" and then click the "OK" button.

Click the "No" button on the popup that asks, "Would you like to use the same location for your back end database?".

Click on the button that says, "Click here to browse for a file location".
If you are in an environment where you are using a server, you will want to point this to the database location on the server (Typically this is a shared drive located on a server).
If you are a single user or have multiple users and this machine will be the main computer (the machine that hosts the database) then the path should be C:\TheServiceProgramData.

Once you have added the correct "Path" to the database you can click the button that says, "OK".

This Step is VERY IMPORTANT - If you receive any of these "Miscrosoft Access Security Notices" then you MUST click "Open" on each and every one of them. Eventually these pop ups will stop showing up and then your tables will be re linked.
WHY? - Each time you get 1 of these pop ups our software is building a new table in your database. If you click Cancel on these pop ups then the software will NOT re link and will NOT work properly!

Please note that it can take up to "10 Minutes" before you receive a popup that says, "Tables Relinked". Once you receive this popup you can "Register" your software.

When you start The Service Program for the first time you will need to register the software. This is the screen that you will see.
You will now need the "Welcome Email" that was sent to you when you first purchased the software. The registration information will look like the image below.

Please Note - The "License Name" Must be entered EXACTLY as it is shown. This includes uppercase and lowercase letters, spaces, commas, periods, etc...
You only have to input the "Company Name" and the "Serial Number" to register your product, however it is recommended that you add all information as this is imported into the software for ease of setup. After you have entered the Company name and Serial number you can simply click the button that says, OK. You will receive a message that says, "Congratulations, the software is now registered".

Now you can sign into the software for the very first time. This is your default username and password:
Username - admin
Password - admin
After you enter the username and password you can hit the "Enter" key twice to sign in OR click the button that says, "Login".
Syncing The Service Program with QuickBooks
If you do Not wish to sync with QuickBooks yet you can always click the button that says, "Close" on the QuickBooks Maintenance Menu. This will bypass the syncing process and bring you directly into the software.
Important - For the very first sync between QuickBooks and The Service Program you Must be signed into QuickBooks as the Admin account and Must be in single user mode. This is due to "QuickBooks Security" and this is the ONLY way to kick in the syncing between our software and QuickBooks.
Now that you are signed into QuickBooks as the admin you can proceed to the next step.

when the QuickBooks Maintenance menu opens, press the top button that is named, "Update The Service Program from QuickBooks".

On the above popup you will need to click the button that says, "Yes".

You will receive the above popup which is asking you to "Allow" The Service program to communicate with your QuickBooks company file. You Must select the area that says, "Yes, Always; allow access even if QuickBooks is not running" and then you can click on "Continue".

Click the button that says, "Done". The Service Program will now start "Syncing" with QuickBooks.

You will notice a green status bar that slowly fills as The Service Program syncs with QuickBooks. Depending on the amount of data being transferred, the initial sync can take anywhere from 10 minutes to several hours to complete. If you receive any error messages during the syncing process please contact Tech Support.

Once you receive the popup that says, "QuickBooks Update Successful" you can enter the software and review your customers and inventory (line items).
Settings
The settings for The Service Program are located in the Misc. Info drop down menu, system, Control table Maintenance

There are different tabs corresponding to different areas of the software.
- Miscellaneous
- Routes
- Tasks
- Email and Web settings
We will go over the stings in these tabs now.

Red Box: Company Registration Information (shows up on reports as company header)
Blue Box: Sets industry specific settings for TSP.
Orange Box: Default QuickBooks template, AR account and sales tax rate.
Green Box: Various percentages for reports within TSP.
A) Default sales tax items.
B) Setting to turn off My Customer Connect.
C) Turns off Syncing with QuickBooks.
D) Disables Jobs from QuickBooks.
E) Show fixed asset items from QuickBooks.
F) Internal number for a new customer created in TSP.
G) Internal number for a new purchase order in TSP.
H) If set to yes, invoice numbers will match from TSP to QB.
I) Default Purchase Order template from QuickBooks.
J) Switch to tell route tickets which template to use by default.
K) Default sales rep from QuickBooks if none selected.
L) Internal number for a new lead created in TSP.
M) Switch so only active customers will be displayed on the next sync from QB.
N) This setting will treat venders as customers in TSP.
O) Default invoice message to be selected on invoices from TSP.

A) Displays the customers phone number on route sheets.
B) Displays a popup when changing a date on the route schedule allowing you to update all the stops to the new date.
C) If you change a note on the route schedule, a popup will prompt you to do this for all customers.
D) If a new stop is added to the schedule it will re-number the other stops accordingly.
E) Allows mapping with Microsoft MapPoint (Requires MapPoint to be installed).
F) Uses google maps to update lat & long values for customers on the route schedule.
G) Custom field labels for the “Route Sheet Condensed” version.

A. Display the customer balance on work orders.
B. Show the customers billing address on work orders.
C. Display the customer phone number on work orders.
D. Display the subdivision and gate code on work orders.
E. Show Ship Address Line 1 on the task list.
F. Print task type questions on work orders.
G. Print rental items on work orders.
H. Task print-out template.
I. N/A
J. When pressing the route schedule button you will be prompted to add open tasks onto the schedule.
K. When printing route sheets that customers also have tasks for, it will show a task summary on the route sheet.
L. N/A
M. N/A
N. N/A
O. Picks the default sales rep for tasks.
P. Print out customer work order history on tasks.
Q. Change the task list layout on the PC.
R. Change the task detail layout on the PC.
S. When completing a recurring tasks be prompted to update the dates in the series based off the completed date.
T. Displays the customer parent as a column on the task list.
U. When creating a new task, the task number will also be the PO Number.
V. When creating a new task and the customer has a popup alert, it will be copied into the task specific notes field.
W. N/A
X. Display driving directions from additional info in the task specific notes field.
Y. Next Task Number.
Z. Show customer notes when printing tasks.
AB. Displays route info for customer on task printout.
AC. Displays customer equipment on task printout.
AD. Display checklist on task printout.
AE. Be prompted to send email of task to employee when creating a new task.
AF. Notify customer via email on task completion.
AG. Be prompted to send email of task to customer when creating a new task.
AH. Receive a popup if the customer doesn’t have an email address.
AI. Displays task specific notes on task printout.
AJ. Default all invoices to be marked as “Print Later” when posting to QuickBooks.
AK. Convert all task text to upper case.
AL. Default service call length when creating a new task.
AM. Default start time on the calendar/schedule view.
AN. Default end time on the calendar/schedule view.
AO. Refreshes the task list at a certain interval.
AP. Sets the start time in the drop down when creating tasks.
AQ. Sets the end time in the drop down when creating tasks.
AR. Option to have the calendar default to week view or month view.
AS. Custom header for Version 5 template of tasks.
AT. Custom header line 2 for Version 5 template of tasks.

A. Email settings for sending emails from The Service Program, not required as it will use our internal server if left blank.
B. When sending emails from TSP, we will include this in the “footer”.
C. When pressing email on the route schedule you can set the default message here.
D. When pressing email on the task list, you can set the default message here.
WOW we have completed the getting started process, You can now start using the software as it is installed, updated, synced, and setup. Thank you and if you need any further assistance please do not hesitate to contact us.